Thursday, April 29, 2010

Main dish: Creamy Orzo with Chicken, Mushrooms and Red Peppers

Let me just start out by telling you that I stole this recipe from my BFF Chelcie! (THANKS SOOOO MUCH GIRL!!!) She found it under one of our favorite food blogs http://www.melskitchencafe.com I read the title and knew instantly that our family would LOVE this! And let me tell you...this dish was AMAZING!!! Everyone gobbled it right up and I had never thought to use cream cheese as a a base for a cream sauce! LOVED the idea and I can't wait to play with it more...so many meats, veggies & pastas so little time! :) I some how want to incorporate asparagus. I think it would taste amazing with this sauce, but this dish already has a lot going on. Anyway, it came together pretty quickly and I served it with a Ceasar salad and cheesy jalapeno bread! I hope you get a chance to put this one on your menu soon! You won't regret it! (Btw, I had it again for lunch today....Oh. My. Word. YUM!)

Creamy Orzo with Chicken, Mushrooms and Red Peppers

*Note: this pasta is best served immediately as it tends to get less creamy as it sits at room temperature – so serve warm right as it finishes cooking! (I heated it up the next day & it looked a little dry, so just be sure to add a touch of water before warming & get gets all creamy again.)

*Serves 4

1 tablespoon olive oil
2 average-sized chicken breasts (about 1 to 1 ½ pounds), cut into chunks
2 red bell peppers, cut into ½-inch pieces
8 ounces white button mushrooms, quartered
1 teaspoon dried thyme
3 cloves garlic, finely minced
1 pound orzo pasta
8 ounces cream cheese, softened (can use 1/3 less fat cream cheese)
1 cup reserved pasta water
1/2 teaspoon salt
1/2 teaspoon pepper
½ cup freshly grated Parmesan cheese
3 tablespoons chopped fresh flat leaf parsley
Squeeze of fresh lemon juice (from 1 lemon)

Bring a large pot of salted water to a boil. Add the orzo and cook according to package directions until tender. When the orzo is ready, reserve 1 cup of the pasta water (ladling it into a small bowl is my method) and then drain the orzo and set aside.

While the orzo cooks, in a large nonstick skillet, heat the olive oil over medium heat. Season the chicken with salt and pepper. Add the chicken to the hot oil and brown on all sides. When nicely browned (but not all the way cooked through), add the peppers, mushrooms and thyme. Stir and let cook for about 5 minutes, until the chicken is cooked through and the mushrooms and peppers have softened and browned and most of the liquid has evaporated. Add the garlic and cook, stirring, until fragrant, about 1 minute.

In the skillet over medium heat, add the softened cream cheese (if you forgot to let the cream cheese soften at room temperature, no worries! Pop it in the microwave for one minute on 40% power) in bite sized chunks and stir so that the cream cheese melts and coats the chicken and vegetables. Add the reserved pasta water and bring to a simmer. Add ½ teaspoon salt and ½ teaspoon pepper. Stir. Add the orzo, Parmesan, lemon juice and fresh parsley. Stir to combine and heat through. Garnish with additional Parmesan and parsley.

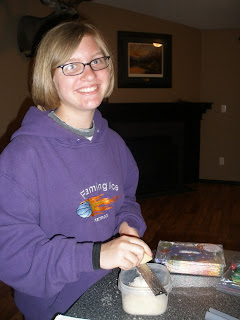
My sweet friend Alyssa came over after school to hang out and help me do some cooking...she is the GREATEST grater ever!!! LOVE YOU ALYS!!! I'm sooo cheesy! (Pun intended!) ;)

Monday, April 26, 2010

Main dish: Sundried Tomato Basil & Cheese Stuffed Shells In Italian Sausage & Pepper Sauce

This dish was so flavorful with the sundried tomatoes and basil! I absolutely heart basil anyway and thought it would be a great addition to this yummy recipe. Now, it does take just a little time preparing due to filling the shells, but you could totally make this the night before or the day of and keep it in the fridge until about an hour before dinner and then just bake until bubbly! I also think that this dish would be VERY freezer friendly! Next time I am totally doubling the recipe and putting one in the freezer for a quick dinner or to take to a new Mom! This dish was also very kid friendly...my 3 yr old liked the fact that we were eating shells! Enjoy!


Sundried Tomato Basil & Cheese Stuffed Shells in Italian Sausage and Pepper Sauce


Shell Filling:
1/4 c boiling water
6 sun-dried tomatoes (not in oil)
1 c shredded mozzarella cheese
1/4 c grated fresh Parmesan cheese
1-1/2 Tbs chopped fresh Basil
1/4 tsp freshly ground black pepper
1/8 tsp salt
14 ounces Ricotta Cheese
1 egg, lightly beaten
12 cooked jumbo pasta shells
Sauce:

1 Tbs olive oil
1 medium onion chopped
1 c chopped green bell pepper
1 c chopped red bell pepper
3 garlic cloves, minced
Cooking spray
3/4 lb. Sweet Italian Sausage (casings removed if any)
1 tsp dried oregano
1/2 tsp freshly ground black pepper
1/8 tsp salt
1 (28-ounce) can crushed tomatoes
2 Tbs grated fresh Parmesan cheese

Hehehe...here is my cute little helper! Sorry I forgot to include the garlic and egg in this pic!

1) Cook the shells half of the recommended time as listed on the product directions. This helps them keep form when filling and to not be too soft once they are baked. Preheat oven to 350°.

2) To prepare stuffing, combine 1/4 cup boiling water and sun-dried tomatoes in a small bowl; let stand 20 minutes or until tomatoes soften. Drain and finely chop. Combine tomatoes, mozzarella, Parmesan, Ricotta, basil, salt, pepper & egg; mix very well until all ingredient are combined. Spoon 2 tablespoons stuffing into each shell. Set stuffed shells aside. (I like to put the filling in a zip lock bag and cut the corner so I can pipe the filling into the shells).

3) To prepare sauce, heat oil in a large skillet over medium-high heat. Add onion, bell peppers, and garlic; sauté 6 minutes or until tender. Place onion mixture in a bowl. Coat pan with cooking spray; return pan to heat. Add sausage, and cook 6 minutes or until browned, stirring to crumble. Stir in onion mixture, oregano, salt & pepper; bring to a boil and then simmer for 20 minutes. (I added about 1/2 c of water to thin out just a tad)

4) Spread 1 cups sauce over bottom of a 9x13 casserole dish coated with cooking spray. Arrange stuffed shells in a single layer in pan; top with remaining sauce. Sprinkle 2 tablespoons Parmesan over sauce. Bake at 350° for 35 minutes or until bubbly.


Friday, April 23, 2010

Menu: What's on my menu this week!?

Here are a few ideas & recipes to look forward to. This is the menu I am cooking up this week! I'll be posting a few of my favorite...so stay tuned!

Sunday: Sundried Tomato and Cheese Stuffed Shells with Italian Sausage & Peppers

Monday: BBQ Chicken Pizza

Tuesday: Chicken Quesadillas & Yummy Mexican Rice

Thursday: Creamy Orzo with Chicken, Mushrooms & Red Peppers

Friday: Basil Chicken in Coconut Curry Sauce

Saturday: LEFT OVERS!!! (I'm a big fan of left over night)

Thursday, April 22, 2010

Appetizer: Cool Veggie Pizza


Let me just tell you that this is by far one of my all time FAVORITE "go to" appetizers! I have made this in soooo many different ways and with soooo many different ingredients and I ALWAYS end up going back for more! The neat thing about this recipe is how flexible it is. You don't like cucumber? Use Broccoli! You prefer ranch mix over dill..do it! You really can't go wrong here as long as you substitute with something similar! Once I was in a pinch and forgot to buy the dressing packet, so I looked up a homemade ranch dressing recipe on line and just added the seasonings that were called (good thing I had almost everything in the cupboard) and you wouldn't have even known! So if you have never had this before then I BEG you to find a reason to make it THIS week! You won't regret it! :o)

Cool Veggie Pizza

1 can (8 oz.) refrigerated crescent rolls
1 package (8 oz.) cream cheese, softened
1-1/2 teaspoons mayonnaise
1 teaspoon Dill Mix or dill weed (You can just add ranch from packet to your taste)
salt and pepper to taste
2 cups of a variety of fresh vegetables: zucchini, mushrooms, carrots, green or red bell peppers, green onions, seeded tomatoes, seeded cucumbers, etc.
1/4-1/2 cup shredded cheddar cheese

Preheat oven to 350° F.
Spread crescent roll dough onto 13-inch baking stone or cookie sheet and pinch seams together. Bake 10-12 minutes or until lightly browned. Remove from oven and let cool completely.

Blend cream cheese, mayonnaise, dill weed, salt and pepper. Spread the cream cheese mixture on top of cooled crust. Coarsely chop or crinkle cut chosen vegetables.

Mix diced vegetables in a medium bowl & then spread mixture over pizza. Top with grated cheese. Refrigerate before serving.

Yield: 8-10 appetizer servings

Tuesday, April 20, 2010

Food ideas: BABY FOOD

When my oldest (who is now almost 3) started eating baby food I would shop for the most wholesome jarred food I could come across. I wanted to be sure I knew what was going into that growing little body of his. So he ate a lot of Earth's Best Baby Food. When I had my second son I figured there had to be another way. By then Jarred baby food had gone up in price from .59 cents a jar to around .89 cents a jar! I started my search online of course reading and learning about homemade baby food. I HAVE to give a shout out to www.wholesomebabyfood.com They taught me everything I know about making your own baby food...recipe's and everything! I was a little sceptical thinking this was going to take me a whole lot of time that I DON'T have now that I have 2 boys! I figured I would give it one shot and see if it was even worth the effort. Let me tell you guys...I was SOLD!!! It was THE easiest thing in the WORLD! I made 3 gallon size zip locks full of baby food one day while both of my boys were down for their afternoon nap and I had time to spare! My little turtle is almost 9 months now and I have been making his food since he was 5 months. So, I figured since this blog was ALL about food...I would show you how easy it is to prepare my little guys food!

First, I start by boiling one 5lb. bag of Bybee Foods Organic Frozen Peas (from Costco). I allow them to boil for about 10 minutes. Important Fact: Any time you are making baby food it is best to use as fresh as possible. Since I didn't have access to fresh peas, frozen was second best and still full of vitamins and all that good stuff!


Second, I strain the peas and put them into my food processor and add a few spoon fulls of the water (that I boiled the frozen peas in) and then process on high for a full minute.


Third, I spoon the pea pure' into clean and sterile ice cube trays. Important fact: One ice cube is about 1 oz. The stage 1 baby food comes in 4 oz. jars, so my little guy eats 4 cubes a meal! He is about ready to move up to stage 2 which is 6oz jars, so he will eat 6 cube...you get the idea! ;o)


Fourth, I allow the baby food to cool on the counter and then cling wrap them and stick them into the freezer for about 12-14 hours. Then I just pop them out and store them in gallon size freezer zip locks! It works wonders. Just always be sure to label your bag with a sharpie to know how long it has been in the freezer and if it is green beans or peas! Important fact: Baby food lasts up to 3 months in a regular freezer and up to 12 months in a deep freezer.


That's IT! You can use this process when making carrots, green beans, sweet potatoes, etc. With my fruit I skip the cooking process all together and just peel, pure' and then freeze! The savings is pretty remarkable too! I bought a huge bag of pears (again Costco) for $3.79 and it made 16 (4oz) jars of baby food. Now that baby food is up to .89 cents a jar who couldn't afford this savings!? 16 jars of pears for $3.79! AMAZING...and I know how it was made and what is in my son's baby food. I hope you give this a try...it will TOTALLY be worth it! :)

Tuesday, April 13, 2010

Soup: Hearty Tuscan Vegetable Soup with Kielbasa & Yogurt Rolls


My Husband and I live in the Northwest and with that comes a lot of cold and rain! So soup is something we love and have often. A few years back we were both on a serious diet and I was on the hunt for a yummy & tasty soup that was low in calorie but that my Hubby & I would still love and enjoy! Weight watchers was kind enough to email me this recipe and I adapted it to fit our family. Since then, this has been a staple meal for us. I make it almost every month from fall to spring and I always double it so that I can freeze half. The rolls are soooo delicious with this soup and I always double that recipe as well since the rolls freeze so well too! I hope you take the time to throw this one together for you family...it will be worth it!


Hearty Tuscan Vegetable Soup with Kielbasa
adapted from Weight Watchers Hearty Tuscan Vegetable Soup

2 tsp olive oil
1 cup onions, diced
3/4 cup carrots, diced
1/2 cup celery, diced
4 cups vegetable broth
1 Turkey Kielbasa sliced 1/2 inch thick
28oz canned tomatoes, diced, in juice, undrained
15oz canned cannellini beans, drained & rinsed (I have used Pinto beans & loved it!)
3 tsp minced garlic
1/4 tsp dried Thyme
1 cup Kale, frozen, chopped (I have used frozen, chopped spinach)
1 cup frozen cut green beans
1/2 tsp salt
1 tsp Fennel seed
1/2 tsp black ground pepper

* Heat oil in a large saucepan, add onion, carrots and celery. Saute 5 minutes until onions are translucent. Add broth, Kilbasa, tomatoes with juice, beans, garlic, fennel seeds, and thyme. bring to a boil. Reduce heat, cover & simmer 5 minutes.

Stir in Kale (or spinach), green beans, salt & pepper. Simmer covered for about 10 minutes or until vegetables are tender. Yields about 6 servings (1 1/2 cups ea.)

Note: Store in refrigerator for up to four days or freeze for future consumption!


Soft Yogurt Sandwich Rolls
Recipe Source: www.bakingbites.com

3 1/2 - 4 1/2 cups all purpose flour
1 tbsp active dry yeast
3 tbsp honey
1 cup water, warm (100-110F)
1 cup yogurt (nonfat/lowfat is fine; I used Greek-style...not sweetened)
1 tbsp vegetable oil
1 1/2 tsp salt

In a large mixing bowl, combine 1/2 cup flour, the active dry yeast, the honey and the warm water. Stir well and let sit for 10 minutes, until slightly foamy.
Stir in yogurt, vegetable oil, salt and 2 cups of the remaining flour. Gradually stir in more flour until you have a soft dough that sticks together pulls away from the sides of the bowl (This can all be done in a stand mixer with the dough-hook attached, as well).

Turn out dough onto a lightly floured surface and knead, adding additional flour if necessary to prevent sticking, until dough is smooth and elastic, or about 5 minutes. Place in a lightly greased bowl, cover with plastic wrap and let rise for 1 hour or until doubled in size.
Preheat oven to 375F. Line a baking sheet with parchment paper.

Turn risen dough out of bowl and onto a lightly floured surface. Gently deflate, pressing into a rectangle. Divide dough into 10 even pieces with a board scraper or a pizza cutter. Shape each piece into a round roll. To do this, take all the corners of one of the squarish pieces you just cut and pull them together, pinching them to create a seal. This will pull the rest of the dough “tight” across the top of your roll, giving you a smooth top. Place on prepared baking sheet. Repeat with remaining dough.
Once all rolls have been formed, press down firmly on each one to flatten. Cover with a clean dish towel and let rise for 25 minutes.

Bake for about 20 minutes, until rolls are deep golden on the top and the bottom.
Cool on a wire rack.
Store in an airtight container.

Makes 10 rolls.

*I divide dough into smaller amounts to make rolls instead of sandwich size rolls. If you make them sandwich size they are EXCELLENT for Mini sliders and BBQ Pork/beef sandwiches!